Sometimes, I wake up on the weekend and know exactly what I want to eat. This morning, however, I wanted four different things that didn't make sense together. I wanted something that felt carb-y, something sweet, something savory, something crunchy... one of those mornings.
Doing my usual google dance for a good recipe using ingredients I have on hand, I found this awesome recipe for waffles, courtesy of 17 Recipes, which was the perfect base. I made some changes per my tastes and wanted some extra body to the waffles via the coconut flour to stand up to the savory filling. Which was still deeeelicious topped with some good maple syrup.
Happy hodge podge breakfasting to you. Maybe it IS possible to have it all... *cough* for breakfast.
Gluten Free/ Primal/ Paleo Waffles (makes 6 waffles)
Ingredients
1/3 cup + 1 tablespoon coconut milk
2 tablespoons coconut oil (for sweet) or butter/ghee (for savory), melted
2 tablespoons ground flax meal
1 tablespoon coconut flour
1 cup almond meal
3 egg whites
3 egg yolks
pinch of salt
for sweet waffles:
1 tablespoon vanilla extract
1 teaspoon ground cinnamon
1 teaspoon maple syrup, honey or coconut sugar
for savory:
1 tablespoon low sodium Adobo seasoning
1/2 cup shredded cheese (I like Organic Valley's Raw Milk Jack Cheese)
2 tablespoons of chives or green onions, finely diced
Directions:
Preheat your waffle iron.
1. Separate egg yolks and whites into two bowls.
2. Add milk, almond meal, coconut flour, flax and a pinch of salt to bowl with egg yolks and combine.
3. Melt fat of choice and add to almond yolk mixture, stirring to combine well.
4. Beat egg yolks until very frothy or peaks form. Fold in 1/4 to 1/3 of egg whites into almond - yolk mixture at a time until all of the egg whites are integrated.
5. Add sweet or savory ingredients to mix.
Batter will be thick and appear somewhat mealy if you add in shredded cheese.
You can use refined coconut oil, melted butter or the fat of your choice that holds up to high heat for greasing. Using an1/3 cup measuring cup, scoop waffle batter into center of greased waffle iron. Cook until desired done-ness. Top with fruit, maple syrup, honey and/or butter of your choice.
Showing posts with label 30 minutes or less. Show all posts
Showing posts with label 30 minutes or less. Show all posts
Sunday, June 2, 2013

Sunday, October 2, 2011
Garlicky Green Gratin / the case for kale
Cooking Light featured this recipe in their cheap eats section in October's magazine. Here is how to make it gluten free and ramp up the flavor with bitter greens and prevent the watery results many testers got from making this recipe per their original directions.
I like Kale any ol' time, but it is harvested in the fall (through LATE fall) since it is super hearty and can survive frost, making it cost effective since it can be locally grown and is perfectly in season right now, when many veggies go up in price. It doesn't cook down as much as spinach and has a bitter, peppery taste that is a real stand out among typical savory.
This right here is a great QUICK cook ahead meal. Perfect for making after dinner on Sunday and enjoying during the week as a lunch on its own or for dinner with a side of brown basmati rice, oven roasted potatoes or blanched lemony asparagus. Serves 4.
I actually made this last Sunday and we didn't touch it until Wednesday. I think refrigerating this after baking sets the mixture a bit more, making for a firmer casserole.
I like Kale any ol' time, but it is harvested in the fall (through LATE fall) since it is super hearty and can survive frost, making it cost effective since it can be locally grown and is perfectly in season right now, when many veggies go up in price. It doesn't cook down as much as spinach and has a bitter, peppery taste that is a real stand out among typical savory.
This right here is a great QUICK cook ahead meal. Perfect for making after dinner on Sunday and enjoying during the week as a lunch on its own or for dinner with a side of brown basmati rice, oven roasted potatoes or blanched lemony asparagus. Serves 4.
I actually made this last Sunday and we didn't touch it until Wednesday. I think refrigerating this after baking sets the mixture a bit more, making for a firmer casserole.
Ingredients
- 1 tablespoon olive oil
- 1 cup chopped onion
- 6 garlic cloves, coarsely chopped
- 6 ounces pork or turkey sausage, removed from casing
- 1/4 teaspoon ground red pepper
- 1 teaspoon dried thyme
- 1/2 teaspoon nutmeg (or less per your taste - I LOVE nutmeg! allspice or even cinnamon can be substituted)
- 2 tablespoons gluten free flour (I used Bob's Red Mill white rice flour)
- 2 cups skim or 1% milk
- 2 large eggs, lightly beaten
- 8 ounces fresh kale
- 4 ounces fresh arugula
- Cooking spray
- 1/3 cup grated parmesan cheese
- 1/2 cup gluten free bread crumbs (I am still using toasted and processed gluten free waffles)
Directions
1. Preheat oven to 450°.
- 2. Heat a Dutch oven or large stock pot over medium-high heat. Add 1 tablespoon oil; swirl. Add onion; sauté 4 minutes. Add garlic; sauté 1 minute, stirring constantly. Add sausage, salt, and pepper; sauté 5 minutes, stirring to crumble.
- 3. Stir in flour; sauté 30 seconds, stirring constantly. Combine milk and eggs, stirring well. Reduce heat to medium. Stir milk mixture into sausage mixture; bring to a boil, stir in kale and cook for 5 minutes. Remove from heat; fold in arugula. Spoon mixture into a glass or ceramic baking dish coated with cooking spray. The greater the surface area, the firmer the mixture will set while baking.
- 4. Add 1/2 cup of gluten free bread crumbs to the top of mixture. Top with parmesan cheese. Bake for 12 minutes or until bubbly and golden brown on top.
Wednesday, August 31, 2011
... Crab Cakes ...
It is very hard for me to use the word or ingredient CRAB seriously. Mostly because my darling Andrea and I have been calling eachother crab for the last few years after a brief obsession with hermit crabs. This recipe and post is for her, obvs.
I needed a quick meal tonight and remembered I had a few cans of crab meat in my massive suburban pantry. (Don't tell Ina Garten that I used canned crab meat. She'll never forgive me. We're best friends in my head, laughing as we pick fresh herbs from her Hamptons garden. Shut up. )
After a bit of internetting, I found the following recipe. The original is a bit high on cholesterol and sodium. You can omit the worcestshire if sodium is a concern and perhaps use egg alternative or two egg whites or vegan mayo in place of the regular to drop the cholesterol down.
Mmmmmmmmmmmmmmmmmmmmmmmmmmm. Nutritional information on the bottom is for original recipe with all the high fat fixins. Substitute away, friends. And do yourselves a favor, sautee these in coconut oil for a touch of added sweetness. Thank you to Laura and Tim for turning me on to that wonderful stuff!
Maryland Style Crab Cakes!
18oz crab meat, picked through for shells and drained if in liquid
4 tsp mayonnaise
1 egg1 1/2 tsp worcestershire sauce
1 1/2 tsp old bay seasoning
1 tbsp onion, grated
1/2 tsp dijon mustard
1 tbsp dried or 2 tbsp fresh parsley
6 tbsp crushed gluten free crackers or bread crumbs (aka 1 frozen waffle, toasted and processed)
Add egg to a large bowl. Whisk until slightly frothy.
Whisk in mayo, worcestershire, old bay, onion, dijon and parsley until well combined. Stir in crab meat. Gently fold in bread crumbs/crackers.
Form crab mixture into 8 evenly sized, flat patties. Think hockey puck sized.
Preheat a large skillet or griddle over medium heat. Add 1 tbsp coconut oil to skillet. Add crab cakes, cooking for 3 - 4 minutes on each side or until deep golden brown. Try to only turn them once to lower the risk of cracking.

These were fantastic with a side of pasta (in lemon zest/juice, creme fraiche, veggie broth and green onions) and sauteed red and yellow peppers, also in coconut oil. Mmmmmm mmm.
Nutrition info (in 2 crab cakes) : 224 calories; 10g off at (5 saturated); 127mg cholesterol; 1131mg sodium; 13g carbohydrates; 2g fiber; 1g sugar; 18g protein
I needed a quick meal tonight and remembered I had a few cans of crab meat in my massive suburban pantry. (Don't tell Ina Garten that I used canned crab meat. She'll never forgive me. We're best friends in my head, laughing as we pick fresh herbs from her Hamptons garden. Shut up. )
After a bit of internetting, I found the following recipe. The original is a bit high on cholesterol and sodium. You can omit the worcestshire if sodium is a concern and perhaps use egg alternative or two egg whites or vegan mayo in place of the regular to drop the cholesterol down.
Mmmmmmmmmmmmmmmmmmmmmmmmmmm. Nutritional information on the bottom is for original recipe with all the high fat fixins. Substitute away, friends. And do yourselves a favor, sautee these in coconut oil for a touch of added sweetness. Thank you to Laura and Tim for turning me on to that wonderful stuff!
Maryland Style Crab Cakes!
18oz crab meat, picked through for shells and drained if in liquid
4 tsp mayonnaise
1 egg1 1/2 tsp worcestershire sauce
1 1/2 tsp old bay seasoning
1 tbsp onion, grated
1/2 tsp dijon mustard
1 tbsp dried or 2 tbsp fresh parsley
6 tbsp crushed gluten free crackers or bread crumbs (aka 1 frozen waffle, toasted and processed)
Add egg to a large bowl. Whisk until slightly frothy.
Whisk in mayo, worcestershire, old bay, onion, dijon and parsley until well combined. Stir in crab meat. Gently fold in bread crumbs/crackers.
Form crab mixture into 8 evenly sized, flat patties. Think hockey puck sized.
Preheat a large skillet or griddle over medium heat. Add 1 tbsp coconut oil to skillet. Add crab cakes, cooking for 3 - 4 minutes on each side or until deep golden brown. Try to only turn them once to lower the risk of cracking.

These were fantastic with a side of pasta (in lemon zest/juice, creme fraiche, veggie broth and green onions) and sauteed red and yellow peppers, also in coconut oil. Mmmmmm mmm.
Nutrition info (in 2 crab cakes) : 224 calories; 10g off at (5 saturated); 127mg cholesterol; 1131mg sodium; 13g carbohydrates; 2g fiber; 1g sugar; 18g protein
Wednesday, January 12, 2011
Gluten Free (and yeast free!) Pizza at Home
I have been up to some spectacular things in my kitchen and have been sooo looking forward to sharing. Happy 2011! Anyway...
When I tell someone about my celiac, pizza comes up quickly on their horrified list of "YOU MEAN YOU CAN'T HAVE _________ ? OR __________? (Because what's really awesome, people, is being reminded of shit I can't eat. Reaaally special.) OH MY GOD! OH MY GOOOODDDD! HOW DO YOU DO IT?"
Now, even before I became GF, I fancied myself a master of recipe substitutions and creating lightened up comfort food. The answer to their question is make it freaking work somehow. I like the foods I like. The key was how to make them healthy.
Beyond healthy now, they also must be gluten free, which presents new challenges. I had mastered GF mac and cheese within two weeks of getting diagnosed, no surprise. But I'm just getting around to pizza now, 6 months later. Even though its not anywhere near the top of my personal list of glutenous delicious things that I miss dearly, I hear it from most people I talk to about my allergy. And see all over the internet that celiacs are clamoring for GF pizza. Granted, its bread, sauce and cheese. It can't really be BAD, can it? But yes, from the reviews I've read of many, many recipes it apparently can.
Here are two options for having gluten free pizza at home. Below you will find one version with a frozen crust my mother found at a market in Jersey and one that I made from scratch at home in about 30 minutes. Both are tasty, I promise.
Contender 1: Glutino's gluten free pizza crusts, which come reasonably price for a pack of 4 which are ready after 20 minutes in the oven. I suggest baking for 10, adding your toppings and putting it back in for 5 - 10 more minutes.
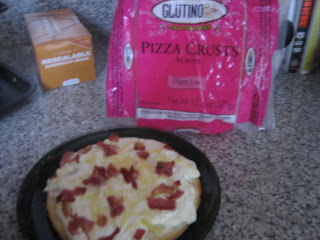
Mine has ricotta, swiss and pancetta. Not bad for a lazy Saturday, right?
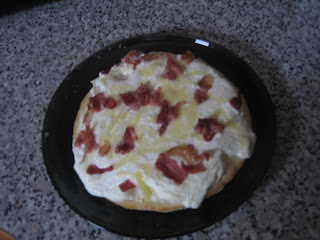
These turn out crispy on the bottom while still chewy the way good NY pizza should be. Not bad for something that required no defrost out of the freezer.
Now, we have a slightly more ambitious endeavor. But considering these two pizzas take up virtually the same amount of time, I'd say go for the gold and follow this recipe here. No pizza pan? No problem. I greased up a regular old rectangular baking sheet that had a lip and it worked perfectly. And its yeast free too!
super easy gluten free pizza crust
1 cup cornstarch
1 cup all purpose GF baking flour mix (I used Pamela's)
1 and 1/3 cups milk (I used 1%, so even skim should be fine)
1 teaspoon EVOO
4 eggs
1 large pinch of salt (maybe 1/4 - 1/2 teaspoon?)
2 tablespoons seasonings (I used rosemary, red pepper flakes, basil and garlic powder since I was doing Italian toppings)
*Mix gently with a whisk until lumps are no more. Don't overmix!
*Pour batter into well greased pizza pan or baking sheet. (I chose the word batter here very carefully. This mixture is going to seem WAY too liquidy and wet to turn into pizza, but it does.)
*Bake at 425F for 10 - 12 minutes or until it is firmly set, resembling crust, and starting to brown slightly on the edges and underneath. (For a crispier crust, brush top with EVOO and add five additional minutes of baking time).
*Add toppings and bake for an additional 7 - 10 minutes or until everything is melty and the crust is golden brown on the edges and underneath. It will smell fabulous when it's done.
How good does this look?

Topped with tomato sauce, part skim ricotta, part skim mozzarella and basil.
And a close up, so you can see how awesome and full of air holes the crust is. Closest thing I've had to regular, crispy on the bottom, chewy in the middle New York pizza since I've been gluten free, for suuuuure.

Woohoo! Pizza may make it closer to the top of my list after all.
When I tell someone about my celiac, pizza comes up quickly on their horrified list of "YOU MEAN YOU CAN'T HAVE _________ ? OR __________? (Because what's really awesome, people, is being reminded of shit I can't eat. Reaaally special.) OH MY GOD! OH MY GOOOODDDD! HOW DO YOU DO IT?"
Now, even before I became GF, I fancied myself a master of recipe substitutions and creating lightened up comfort food. The answer to their question is make it freaking work somehow. I like the foods I like. The key was how to make them healthy.
Beyond healthy now, they also must be gluten free, which presents new challenges. I had mastered GF mac and cheese within two weeks of getting diagnosed, no surprise. But I'm just getting around to pizza now, 6 months later. Even though its not anywhere near the top of my personal list of glutenous delicious things that I miss dearly, I hear it from most people I talk to about my allergy. And see all over the internet that celiacs are clamoring for GF pizza. Granted, its bread, sauce and cheese. It can't really be BAD, can it? But yes, from the reviews I've read of many, many recipes it apparently can.
Here are two options for having gluten free pizza at home. Below you will find one version with a frozen crust my mother found at a market in Jersey and one that I made from scratch at home in about 30 minutes. Both are tasty, I promise.
Contender 1: Glutino's gluten free pizza crusts, which come reasonably price for a pack of 4 which are ready after 20 minutes in the oven. I suggest baking for 10, adding your toppings and putting it back in for 5 - 10 more minutes.

Mine has ricotta, swiss and pancetta. Not bad for a lazy Saturday, right?

These turn out crispy on the bottom while still chewy the way good NY pizza should be. Not bad for something that required no defrost out of the freezer.
Now, we have a slightly more ambitious endeavor. But considering these two pizzas take up virtually the same amount of time, I'd say go for the gold and follow this recipe here. No pizza pan? No problem. I greased up a regular old rectangular baking sheet that had a lip and it worked perfectly. And its yeast free too!
super easy gluten free pizza crust
1 cup cornstarch
1 cup all purpose GF baking flour mix (I used Pamela's)
1 and 1/3 cups milk (I used 1%, so even skim should be fine)
1 teaspoon EVOO
4 eggs
1 large pinch of salt (maybe 1/4 - 1/2 teaspoon?)
2 tablespoons seasonings (I used rosemary, red pepper flakes, basil and garlic powder since I was doing Italian toppings)
*Mix gently with a whisk until lumps are no more. Don't overmix!
*Pour batter into well greased pizza pan or baking sheet. (I chose the word batter here very carefully. This mixture is going to seem WAY too liquidy and wet to turn into pizza, but it does.)
*Bake at 425F for 10 - 12 minutes or until it is firmly set, resembling crust, and starting to brown slightly on the edges and underneath. (For a crispier crust, brush top with EVOO and add five additional minutes of baking time).
*Add toppings and bake for an additional 7 - 10 minutes or until everything is melty and the crust is golden brown on the edges and underneath. It will smell fabulous when it's done.
How good does this look?

Topped with tomato sauce, part skim ricotta, part skim mozzarella and basil.
And a close up, so you can see how awesome and full of air holes the crust is. Closest thing I've had to regular, crispy on the bottom, chewy in the middle New York pizza since I've been gluten free, for suuuuure.

Woohoo! Pizza may make it closer to the top of my list after all.
Subscribe to:
Posts (Atom)